THE POWER OF REFERENCE PHOTOS 照片的力量
cs:source吧
全部回复
仅看楼主
level 14
hzm654321 楼主

A picture is worth a thousand words
They say a picture is worth a thousand words; for this reason, I will just add 2 pictures here and call this paper done.
“Awkward silence”…
I don’t think you bought this, did you? No? Well, that means I have to write a proper paper then.
A picture has the ability to stir emotions in us and awaken buried memories; a photo of a beautiful fiery sunset can be awe-inspiring while a photo of an old rural house can get you back in time to fond memories of your grandparents’ house in the countryside.
In level design, pictures are still a vehicle for emotions and memories, but on top of that, they gain an additional role that further elevates their status. They become an important, may I say indispensable tool in planning, pre-production and level-building phase itself.
I briefly touched on the subject of reference photos in a paragraph in one of my previous papers, “Planning to win – sketching your level”; the subject will be expanded and covered in-depth in the present paper to showcase how and where to efficiently use reference photos during the lifetime of a level design project to produce near realistic, breathtaking levels.
The multi-usage of reference photos
As I have already mentioned, reference photos shall be used during the 3 stages of a level design project: planning, pre-production and actual level building phase.
We shall see now how reference photos come in handy in each phase, backed with examples and screenshots from different maps.
Remember that reference photos can be your own personal photos (if you are a professional or amateur photographer) or simply photos that you get off the internet from various sources.
Planning
Remember the planning phase? You don’t? Well, you need to get back to my earlier paper mentioned above (planning to win) and give it a good read.
If you remember, then you recall that the first step in planning, before even sketching the level on paper, is to brainstorm ideas to find a suitable theme for your map. As we have seen in that paper, inspiration can be drawn from several sources: movies, music, books, TV shows, magazines, news, area/city you live in and, of course, photos.
As in real life, a photo can be an inspiration, a strong motivator to start a level design project or to create a scene based on the content or even on one aspect in the photo.
My map de_spezia started life as an idea that was sparked by one photo of the town of Manarola in the Cinque Terre region of northern Italy.
Of course, that one photo won’t be enough to complete the whole map obviously, however, it was all what was needed to spark the idea in my head and strongly motivate me to design a map around this town and other similar towns in the La Spezia region of Italy.
A reference photo, on top of pure inspiration, can also be used to identify and adopt a certain theme for your map.
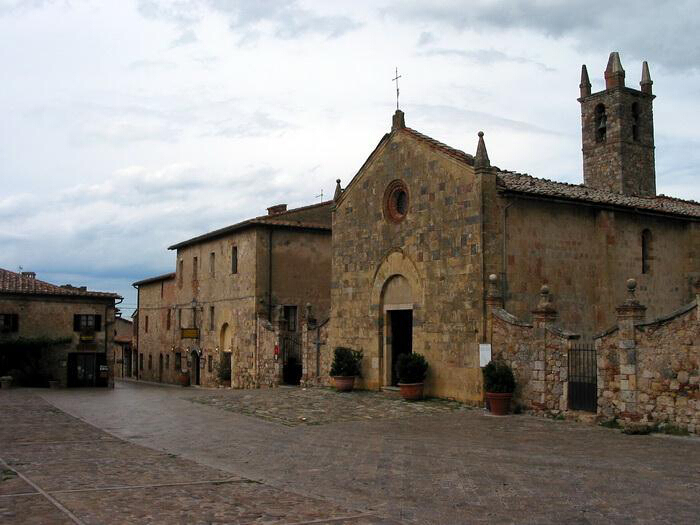
My latest map cs_calm has an old village theme, yet I was not sure which style to go for since there are various European village architectural styles that are quite diverse (Italian, French, Spanish, Dutch, East European, etc…). I finally settled on a northern France village theme (and Scotland villages too since they have many similarities), and that was because of one reference photo that tipped the balance in favor of beige/grey-ish stone walls and slanted tile roofs (village of Saint-Céneri-le-Gérei in Normandy).
2015年06月23日 11点06分 1
level 14
hzm654321 楼主

Pre-production
Going back to my planning paper, the pre-production phase which comes right after the initial planning phase, is where you or a collaborating artist prepare the assets for the map to be built (textures, models, etc…).
What do reference photos have to do with pre-production, I hear you say.
Everything, is the simple answer.
Whether you are crafting new models and props or designing new textures and materials, reference photos should be your guideline. If you are going to sculpt new props for your maps, then be sure to follow closely the architecture and shapes present in your photo. Texture creation should also be in line with what is present in the reference photo.
Here is an example from de_inferno which is based on San Juan Capistrano in California.
Notice how the prop modeler and texture artist have faithfully recreated the various models (water fountain, window frame, roof bits, cactus, bells…) as well as the stone walls, cobblestone floor and various trim textures. The in-game shot faithfully recreates elements of the reference photo for maximum realistic and visual eye-candy results.
Please note that even if you are not going to create your own custom assets, make sure that the stock assets used are more or less in harmony with the reference photo. Going back to the example of cs_calm (reference from old French and Scottish villages), it would be absurd to use stock textures of de_nuke (industrial); a more natural choice would be stone walls from de_cbble or de_inferno.
An added bonus for texture creation is that when the reference photo is of high resolution/high quality, it can be used itself to create the corresponding texture in-game.
The process would involve a good knowledge of 2D editing programs such as Photoshop or Gimp to make sure the transition from reference photo to in-game texture is smooth and artifact-free. Typically, the process would include playing with levels/curves/contrast, skewing/changing perspective, multi-layering, erasing, cloning, masking, cropping, making seamless and resizing among other tasks.
Here’s a reference shot of a building façade that I turned into in-game texture for my map de_brooktown.
2015年06月23日 11点06分 2
level 14
hzm654321 楼主

Level Building
We have now reached the level building phase where you will be busy adding and sculpting your level’s architecture based on, you guessed it right, the reference photos. Those photos, considered as blueprints to create the various shapes in your map, should be open on your screen at all times for easier access and reference.
The way I proceed with reference photos is quite simple and methodic, and I have briefly explained it in the previous paper (planning to win): On the drawn layout of your map (done during the planning phase), you just need to write down the name of a specific
reference photo on a precise location or part of the map; this simply means that you will build this part of the map following the guidelines of that particular photo.
Here’s the hand drawn layout of de_cortona to further clarify and showcase the above in action.
You can see the names of the references written all across the sketch such as “Tuscan square”, “foto SG cathedral”, “foto monteriggioni 024”, “Tuscany borgo”, “corfino lucca”, podere la vecchia”, etc.; these are simply the names of the reference photos (the actual names of the JPEGs) that I gathered earlier during the planning phase.
How to assign reference photos to different parts of the map is just a matter of common sense. Remember that the photo will be used as a visual guideline to help you build that part of the map, therefore, the content of the photo should best represent what you have in mind for building that part.
In de_cortona’s case, I used my personal photos as well as pictures that I searched for from the list of towns that I wrote in the upper right corner of the sketch. As I mentioned earlier, all you need to do is assign and write down a reference photo to a specific area of the sketch that you think is best represented by this photo. As an example, bomb site A in de_cortona is about a town hall and bomb site B is about a church; obviously I used the Monteriggioni’s church photo for B and Cortona’s town hall photo for A.
Always remember that you have a choice either to faithfully recreate the building in question (if it is a prominent feature of the map) or to use the photo as an inspiration to create something similar in the level editor; this is called artistic freedom and you should exercise your right to do so.
Let us showcase some examples of de_cortona where you can see and compare real life versus in-game shots to observe how reference photos were used, and whether they were employed for faithful recreation or mere inspiration.
Bomb site A – Cortona town hall
Bomb site B – Monteriggioni church
2015年06月23日 11点06分 3
level 14
hzm654321 楼主

Middle – San Gimignano gate
Courtyard – Pistoia monastery
As if all these powers are not enough, reference photos possess an additional power during the level building phase: breaking creative block.
If you are not sure what creative block is and how to combat it, then a previous paper of mine (Overcoming Creative Block in Level Design) should shed plenty of light on this issue. Reference photos are amongst the natural remedies for creative block as just the act of quickly viewing and going through your collection of photos specific to the map in hand could trigger your creative juices. Various colors, shapes and forms that are present in those photos can do wonders to your brain’s creative center.
The photos, when reviewed, might be the straight solution to your creative block, and even if they do not work directly, they could indirectly spark derivative solutions in your mind that are enough to jumpstart your project and shift it to higher gear.
2015年06月23日 11点06分 4
level 14
hzm654321 楼主

You got my reference?
As we have amply witnessed, reference photos are a crucial aspect of level design and environmental art, whether it be in early stages of planning and pre-production or in later stages of level building.
Many beginners disregard reference photos out of ignorance or negligence, however, in both cases, their final work is more than often producing maps that are incoherent and disproportionate, and in many cases, unrealistic.
As a level designer, once you start incorporating reference photos in your work flow, you will begin to produce far better levels that are accurate, realistic and proportionate; after all, you are now relying on solid blueprints instead of just your imagination.
As I always say regarding processes, you have to do them over and over until they become second nature in you; you might start slow but you will reap great benefits in the long run. Your levels will speak for themselves.
Will2k
March 23, 2015
2015年06月23日 11点06分 5
level 12
原来是Will2k的文[汗]
2015年06月25日 04点06分 7
结尾有署名[乖]
2015年06月25日 06点06分
level 12
牛逼到爆
2015年06月25日 12点06分 8
level 11
我以为要发贴图福利呢直接就拉到底[冷笑话]
2015年06月26日 12点06分 9
[哈哈]
2015年06月26日 13点06分
level 12
额.........没看懂[笑眼]
2015年07月14日 05点07分 10
1